Tuesday, December 13, 2011

What's for Apps? Oysters Rockefeller!

It was our friend Greg's birthday on Sunday, and to celebrate he brought over oysters to our place and made a batch of Oysters Rockefeller (I know...he was doing the cooking on his birthday!) and also steamed a couple of dozen.  It is oyster season, and we are spoiled living here at the beach, because we get great oysters from nearby Stump Sound.  I always think of oysters as kind of a pain to make, though, because of the shucking.  But once you get that down (and it is a bit of a process), they rest is easy!  Maybe you can sweet talk your local oyster seller to shuck 'em for you.  That would be the best!  But, regardless of how you get them shucked, try this recipe...it's really good!!  Enjoy!

Oysters Rockefeller
Adapted from Epicurious.com
Serves 6
Printable Recipe

  • 2 cups firmly packed baby spinach, finely chopped
  • 4 cloves garlic, minced
  • 3 tablespoons finely chopped scallions
  • 1 tablespoon finely chopped fresh flat-leaf parsley
  • 2 teaspoons minced celery
  • 1/4 cup coarse fresh bread crumbs (preferably from a day-old baguette)
  • 3 1/2 tablespoons unsalted butter
  • Pinch of cayenne
  • 5 bacon slices
  • 1/4 cup shredded or grated Parmesan cheese
  • About 5-8 cups kosher or rock salt for baking and serving
  • 20 oysters on the half shell, oysters picked over for shell fragments and shells scrubbed well


Preheat oven to 450°F. Toss together spinach, garlic, scallion, parsley, celery, and 2 tablespoons bread crumbs in a bowl. 


Melt butter in a 10-inch heavy skillet over moderate heat, then add watercress mixture and cook, stirring, until spinach is wilted, 1 to 2 minutes. Stir in cayenne, and salt and pepper to taste, then transfer mixture to a bowl and chill, covered, until cold, about 1 hour.

While spinach mixture chills, cook bacon in cleaned skillet over moderate heat, turning, until crisp, then drain on paper towels and finely crumble.


Spread 5 cups kosher salt in a large shallow baking pan (1 inch deep) and nestle oysters (in shells) in it. Spoon spinach mixture evenly over oysters, then top with bacon and sprinkle with remaining bread crumbs and Parmesan cheese. Bake oysters until edges of oysters begin to curl and bread crumbs are golden, about 10 minutes. Serve warm oysters in shells, nestled in kosher salt (about 3 cups), on a platter.  Enjoy!

Thursday, December 8, 2011

What's for Dessert? Peanut Butter Cup Brownies!

A friend relayed some good news to me today...it's National Brownie Day!  Considering I had 4 boxes of my favorite brownies in the pantry because they were on sale...it called for celebration.  Now, I can't even call this a recipe, because it is not by any means homemade, but I thought I would share this with you because these are the best brownies EV-AH!  Ghirardelli Dark Chocolate Brownies rock my world.  And I got a crazy thought...why not add in another one of my favorite things EV-AH...Reese's Peanut Butter Cups!?!  A pretty perfect dessert for me on any given night is a Reese's, but when you add them to my favorite brownie...perfection personified! This is so quick and easy, even the worst bakers (me included) can't screw it up!  Try it, you'll love it!

Peanut Butter Cup Brownies
The box says serves 16...who are they kidding???  Serves about 6!

  • 1 box Ghirardelli Dark Chocolate Brownie Mix
  • 1/2 bag Reese's Peanut Butter Cup Minis (up to you what to do with the other half of the bag...hmmm...but below is another recipe I've been wanting to try that I found on Pinterest***)

Prepare brownie mix to package directions.  Stir in peanut butter cups into the batter.  Fill a greased, 9x9 glass baking dish with batter.  Bake at 325 for about 35 minutes.  Don't over bake.  You want them to be sort of gooey! For extra indulgence, serve warm with vanilla ice cream.  Ohhhhh, yeah.

***Try below recipe with the remaining peanut butter cups and tell me how it is.  After I pop out baby #2, it's go-time! 
Peanut Butter Cup Martini

Wednesday, December 7, 2011

What's for Dinner? Seafood Chowder!

This past weekend was a good one.  We had our annual Christmas party and it was a ton of fun.  The food theme this year was "Paninis and Crostinis".  Basically, just a lot of different sandwiches from different countries.  It was fun to do (and I will be blogging a few of them in the upcoming weeks) and oh-so-delicious.  We had a lot of leftover sandwiches, and what goes better with sandwiches than soup?  I was feeling seafood, and chowder is nice and hearty (I would say for the cold weather we have been having, but it was 75 degrees today!).  This chowder was really good, and it led me to beg the question, "why does chowder you get in a restaurant have to be SOOOO bad for you?"  This chowder that I made had no cream at all...only 1 cup of 2% milk.  The stats on it are really good for such a thick and creamy soup.  And you can basically use any seafood you like...mix it up!  Give it a try...you won't be sorry!


Seafood Chowder
Serves 6-8
Printable Recipe

1 TBSP olive oil
2 leeks, mostly white part, halved and thinly sliced
2 ribs celery, diced
1 potato, peeled and cut into 1/2 to 1 inch dice (depending how chunky you want them)
3 cloves garlic, minced
1/4 cup flour
1 1/2 cups seafood stock (this can be found now in any grocery store in the broth/stock section...if not, use chicken broth)
1 cup milk
1 lb cod or halibut, cut into small chunks
1 lb raw shrimp, peeled and roughly chopped
1/2 lbs bay scallops (the small ones)
1 cup grated Gruyere cheese
1-2 TBSP fresh dill
salt and fresh ground pepper to taste

In a large dutch oven or soup pot, heat oil over medium high heat.  Add celery and leek and saute until just soft.  Add garlic and potato and saute 2 minutes more.  Sprinkle flour over veggies, stir and let cook several minutes.  Add broth and stir well.  Let thicken.  Add milk and stir.  Simmer until potatoes are just soft.  Add in fish, cook for 1-2 minutes.  Add shrimp and scallops.  Let all simmer for another 5 minutes.  If chowder gets too thick, add some more stock.  Add dill. At the very end, add in Gruyere cheese and remove from heat.  Serve with garlic toast or oyster crackers and top with more cheese, if desired.  Enjoy!

Thursday, December 1, 2011

What's for Dinner? Divan Stuffed Chicken!

Chicken Divan is an old favorite of mine.  It is one of my go-tos when I can't think of anything else to make or if I just want a quick, one-dish meal.  Tonight I was in the mood to stuff a chicken breast (for some weird reason) and I thought that a Divan-like stuffing would be really good.  It turned out way better than I expected.  The curry-flavored filling inside the breaded chicken breast tasted just like the casserole version, but a little more sophisticated (aka, better)!  This kicks the old Chicken Divan up to the next level.  I will definitely making this again.  Don't let the stuffing process intimidate you!  I thought I was done for...I accidentally cut all the way through one of my breasts and had filling oozing out in every direction.  But I rolled up my sleeves and completed the breading process and by the time I had the chicken in the skillet, it all came together and was fine.  Just go with it!  Give it a try...you'll be a Stuffed Divan convert!

Divan Stuffed Chicken
Serves 4
Download PDF of Recipe

1 crown broccoli, cut into small florettes and steamed until soft
1/2 can cream of chicken soup (I use the Healthy Request version)
1/2 teaspoon curry powder (add a little more to taste if you like the curry flavor)
2 TBSP light sour cream
4 slices cheddar cheese (could also sprinkle shredded cheese instead)
4 chicken breasts
1/2 cup flour
1 tsp season salt or Cajun spice
1 tsp fresh ground black pepper
1 egg, beaten
1 cup seasoned breadcrumbs
2 TBSP olive oil

Preheat oven to 375.

In a small bowl, mix together broccoli, soup, curry powder and sour cream.  Set aside.

In three shallow bowls or plates, prepare the breading station.  In the first bowl add flour, Cajun spice (or whatever spices you like), and pepper.  Mix well.  In second bowl, add egg and scramble well.  In third bowl, add bread crumbs.

For each chicken breast, make a slice horizontally through the breast, being careful not to slice all the way through (slice it the way you would open a book).  Peel back the top of the breast and stuff each breast with 1/4 of the broccoli mixture.  Lay the cheese over the mixture (I used cheese slices and halved them so they would fit better) and pull top of the chicken over everything and press together (try and get everything to stay inside, but this is tricky!).  Once the breasts are stuffed, roll in flour, then egg then bread crumbs.

In a large skillet, heat olive oil until hot.  Add breasts and saute on each side until they are golden (but not cooked through), about 2-4 minutes on each side, depending on how hot your stove gets!

Either put skillet in oven (if it is oven proof), or transfer breasts to a baking dish lined with foil and sprayed and cook until all the way done, about 12-18 minutes, depending on how thick your breasts are.  Remove from oven and serve with mashed potatoes or yellow rice.  Enjoy!

Monday, November 28, 2011

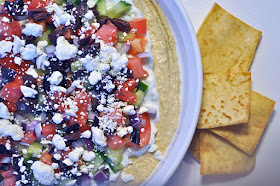
What's for Apps? Greek Seven Layer Dip!

In our family, the day after Thanksgiving is usually just kind of a do-your-own-thing day when it comes to food.  There is a lot of leftover action and kind of constant grazing.  Although, after the gluttony of Thanksgiving Day, I was kind of wanting a snack that was healthy.  This is a take on the ever-loved Mexican Seven Layer Dip, but it hails from the Aegean, rather than the Gulf of Mexico. It is easy, REALLY good, and healthy. What more can you ask for?  Although beware, it is so good, you might just eat the whole thing yourself.  Take this to your next party and it'll have everyone screaming OPA!  Enjoy!

Greek Seven Layer Dip
Serves 4-6
Download PDF of Recipe

1 English cucumber (the long thin ones that come in plastic wrap)
1 5-oz container fat free Greek yogurt (I like Fage)
juice of 1/2 lemon
1 clove garlic, pressed
salt and pepper to taste
1 10-oz container hummus (I LOVE the Sabra brand...I use either garlic or plain)
1 tomato, diced
1/4 cup red onion, finely diced
1/2 cup pitted Kalamata olives, roughly chopped
1/2 cup crumbled Feta cheese
pita chips

To make tzadziki: cut cucumber in half.  Peel one half.  Grate the half over a doubled paper towel.  Squeeze out as much water as you can.  In a small bowl, add Greek yogurt.  Mix in grated cucumber, lemon juice, pressed garlic and salt and pepper to taste.  Refrigerate (you can do this ahead of time).

In a serving dish, add hummus and spread evenly on bottom.  Add tzadziki and spread evenly.  Cut the remaining half of the cucumber in a small dice and add on top.  Add diced tomato, onion and olives. Sprinkly feta over top and serve with pita chips.  Mmmmmm.

Monday, November 21, 2011

What's for Dinner? Chicken Stroganoff!

I've had mushrooms on the mind lately.  I don't know how my sister and I can differ so greatly on something...she absolutely abhors them, and I love them with a passion!  The past couple of times I have been into the Fresh Market, they have had some awesome mushrooms there.  Here in Wilmington, good, wild mushrooms are hard to come by.  But I have recently gotten chanterelles, huge shiitakes, oysters, enokis, etc. etc. For this recipe, I used shiitakes and baby portobellos.  The classic version of this dish uses beef, and if you want to use that, great.  But chicken is quicker and healthier and I just prefer it, most of the time.  This is a really quick and easy dish to make that is healthy and hearty.  If you are into mushrooms, like me, you can't go wrong!  Try it and enjoy!

Delicious 'shooms!
Chicken Stroganoff
Serves 3-4

2 TBSP olive oil, divided
1 medium onion, diced
16 oz sliced mushrooms of your choice
3 cloves garlic, minced
2 large boneless, skinless chicken breasts (just under a pound total)
3 TBSP flour
1 cup chicken broth
1/2 cup white wine
6-8 springs fresh thyme or 1/2 teaspoon dried
1 TBSP butter or spread
1 cup light sour cream
salt and pepper to taste

In a large skillet, heat 1 TBSP olive oil on medium high heat and add onion.  Saute for several minutes, until onion starts to soften.  Add mushrooms and cook until they become browned and soft.  Add garlic and saute one minute more.  Reserve mixture to separate bowl and put aside.  In the same skillet, heat the rest of the oil.  Add chicken and saute until browned and cooked through.  Add back in onion and mushroom mixture.  Sprinkle flour over everything and stir to coat well.  Add chicken broth, wine and thyme and stir.  Simmer for 5-10 minutes until mixture becomes thick.  Turn off heat and stir in butter and sour cream.  Season with salt and pepper to taste.  Serve over hot buttered egg noodles or rice.  Enjoy!

Download PDF of Recipe

Wednesday, November 16, 2011

What's for Dinner? Spanish Fideuà (aka Noodle Paella)!

I love paella.  It has everything good...rice, seafood, sausage!  When we were in Barcelona, I remember seeing this thing called Fideua on the menu...it was actually a noodle version of paella--even better!  I really wanted to try it, but we ran out of time before I got a chance. Today as I was thinking about what to make for dinner, I remembered I had some fideos (which is just the Spanish word for noodles) that I bought at the Mexican mart last time I went.  They are actually just dried vermicelli noodles, cut into about 1-inch pieces.  I thought it may be a little quicker than the rice version and I surprisingly had everything else to do the (quick version) of the recipe.  It was awesome and super fast to make.  All the good flavor of paella, without the sweating over the hot pan while the rice slowly cooks!  It would be great with even more seafood (i.e. mussels, scallops, etc.)...I just used shrimp because that is what I had!  And I used lowfat turkey smoked sausage, trying to keep it a little lighter, but would also be excellent with Spanish chorizo, as the traditional dish calls for.  Give it a try!!  Enjoy.

Spanish Fideua (aka Noodle Paella)
Serves 4-6
  • 2 TBSP olive oil, divided
  • 1 large onion, diced
  • 2 cloves garlic, minced
  • 1 lb smoked sausage or Spanish chorizo, cut in 1 inch pieces
  • 7-8 oz fideos (don't worry, if you can't find these, just cut dry angel hair or vermicelli in 1-inch pieces!)
  • 1, 28-oz can diced tomatoes with juice (I use good, San Marzano tomatoes)
  • 1/2 cup white wine
  • 2-4 cups chicken broth
  • 2 tsp Spanish smoked paprika (this is NOT regular paprika)
  • 1 large pinch saffron threads
  • 1/2 cup frozen peas
  • 1 lb shrimp, peeled and deveined

In a large skillet, heat 1 TBSP oil until hot.  Saute onion until just soft.  Add garlic and sausage and saute until sausage is browned (the sausage should be pre-cooked, so you are just browning, not cooking).  Once done, scrape into bowl.  In same skillet, heat the remaining oil.  Add in dry pasta and saute until pasta starts getting a nice golden-brown color.  Once that happens, add in tomatoes, sausage/onion mixture, wine, 2 cups chicken broth, paprika and saffron.  Stir well to combine and reduce heat to a low simmer.  Let it sit now, without stirring, until the noodles look like they have absorbed most of the liquid.  Then, scrape the bottom and add in another cup of broth.  Repeat.  At the end of this, if the noodles are almost tender, add in peas and shrimp and a little more broth.  Let simmer until both shrimp and noodles are cooked and the rest of the broth is mostly absorbed (don't let the noodles cook too long...you don't want them to get mushy...you have to keep an eye on it and judge how much time you need).  Serve with some crusty bread and enjoy!

Download PDF of Recipe

Tuesday, November 8, 2011

What's for Dinner? Mexican Stuffed Shells!

I found the idea for this recipe online and thought it looked great.  I am a sucker for anything Mexican and anything pasta...and this combined both!  It came out so much better than I imaged.  The flavor was great and overall it was pretty easy to make.  The stuffing of the shells only took about 10 minutes and the rest of the cooking didn't take long either.  Please make this...Sully deemed it the best new recipe we've had in a while! Enjoy!


Mexican Stuffed Shells
Serves 5 (4 shells each)

20 jumbo shells
1 TBSP olive oil
20 oz ground turkey (93% lean)
1 packet taco seasoning
4 scallions, diced
1 clove garlic, minced
4 oz cream cheese
1 can Goya Black Bean Soup**, drained
1 cup Spencer's Salsa (or your favorite jarred brand)
1 packet Frontera Chipotle and Garlic Taco Skillet Sauce
1 cup shredded Mexican cheese
green onion and sour cream for garnish

Preheat oven to 350. In a large pot, bring salted water to a boil.  Cook shells to specifications.  Drain and coat with a small amount of olive oil to prevent sticking.  Let cool.

In a large skillet, add olive oil and when hot, add turkey and taco seasoning.  Saute until browned and cooked through.  Add onion and garlic and saute one minute more.  Reduce heat to low and add in cream cheese.  Stir until thoroughly combined.  Add in black beans and stir.  Remove from heat.

In a 9x13 baking dish, coat the bottom with salsa.  Stuff each shell with the meat mixture and lay in dish.  Cover with taco sauce and sprinkle with cheese.  Bake for 30 minutes or until cheese is hot and bubbly.  Broil to brown cheese, if desired.  Garnish with onion and Sour cream.  Enjoy!

**Goya Black Bean Soup is the undiscovered king of black beans.  I don't use it as soup...I use it whenever I need black beans.  They are perfectly seasoned and in a little thicker sauce.  Try them!!  They can either be found in the Hispanic section, the soup section, or the bean section.  Sooo worth the hunt!

Download PDF of Recipe

Sunday, November 6, 2011

What's for Sides? Cheddar Jalapeno Cornbread

This weekend, fall was in the air.  It was the perfect time for chili and cornbread!  My friend Greg got out his awesome chili recipe (which I will be posting here later) and I looked around for a few cornbread recipes.  I found this one that I adapted.  It was orginally supposed to be for corn sticks, cooked in a cast iron mold.  I know I have just about every kitchen/cooking gadget known to man, but shockingly, I do not own cast iron corn stick molds.  So...I adapted the recipe and it came out REALLY good.  The recipe had just a hint of the jalapeno flavor without being too hot.  If you want more heat...add more jalapeno!  You could even add crisp, crumbled bacon to this and it would be awesome!  This is a simple recipe sure to please. Try it and enjoy!

Cheddar Jalapeno Cornbread
Serves 6

1/2 jalapeno, seeded and finely minced
3 scallions, diced (white and green parts)
2 cloves garlic, minced
2 TBSP butter or spread (I use Brummel & Brown)
1/2 cup all purpose flour
1/2 cup yellow cornmeal (not self-rising)
1 tsp salt
1 tsp sugar
1/2 tsp baking soda
1/2 tsp baking powder
1 egg
1 cup buttermilk
1 cup shredded cheddar cheese

Preheat oven to 425. In a small skillet, heat the butter until hot.  Add jalapeno, onion and garlic.  Saute 1-2 minutes until fragrant and they begin to soften.  Remove from heat and let cool a bit.

In a large bowl, combine flour, cornmeal, salt, sugar, baking soda and baking powder.  Mix together and form a well in the middle.

In a small bowl combine egg and buttermilk.  Beat until combined.  Pour into well of dry ingredients and mix until thoroughly combined and a sticky dough is formed.  Add in pepper mixture and cheese.  Combine well.

Coat a 9x9 glass dish with cooking spray and add the dough mixture to it.  Cook for 20 minutes until bread is just starting to brown.  Serve hot with butter!

Download PDF of Recipe

Wednesday, October 26, 2011

What's for Dinner? Flounder with Linguine and Tomato Sauce!

We've been on vacation in Charleston for the past week, and let me tell you, we had some AMAZING food!  Charleston does not disappoint in the culinary department.  But one thing the food isn't...healthy.  We were traveling with a vegetarian, and it was particularly hard finding something that didn't have some sort of pig product in it (it is the South, after all!).  At one restaurant, the homemade buttermilk rolls were actually served with "pork butter".  So, needless to say, after last week, we are looking for some healthy meals again.  This dish is something my mom made growing up.  It is extremely fast (good thing, cause the in-laws are in town!) and very healthy.  And it is pretty cheap, because you can use any thin white fish that they have at the market, and tilapia is usually always there and super inexpensive. I made this tonight with flounder because I really like the flavor of it (and it was also on sale at the 'Teet). Hopefully after eating a few healthy dishes like this, some of that pork butter will start magically melting off of my hips.  Enjoy!

Flounder with Linguine and Tomato Sauce
Serves 4

1 TBSP olive oil
5 cloves garlic, peeled and minced
1, 28-oz can good diced tomatoes in juice (I use San Marzano)
1/2 lemon, juiced
1 large handful basil, chopped
2 TBSP capers
1 lb flounder fillets
8 oz linguine, cooked to specifications
parmesan cheese

In a large skillet, heat olive oil and add garlic.  Saute until fragrant, about 1 minute.  Add tomatoes with juice and simmer about 5 minutes.  Add lemon juice, basil and capers and simmer 5 minutes more.  Add flounder in one layer over tomatoes.  Cover.  Cook for about 4-5 minutes until fish becomes opaque and flakes easily (don't overcook...we don't like mushy fish!). Serve fish on top of pasta and spoon sauce on top.  Garnish with Parmesan.

Download PDF of Recipe

Thursday, October 13, 2011

What's for Dinner? Chicken Paprika!

I should really rename this blog "What's for Dinner Sully and Angie?" because my friend Angie is an amazing cook and she frequently helps me with my recipe planning.  She came across this recipe in the newspaper recently and told me I had to try it.  It was originally called "Chicken Sputnik" and it was a recipe contributed by actress Rachel Bilson of all people (random!).  I have changed it a bit and renamed it, because I don't like the name Sputnik.  So there.  This is a really easy recipe that is hearty and has a wonderful flavor.  And it's a one-pan deal, so not much cleaning to do, which is always a bonus!  If you are squeamish about chicken with bones, you can use boneless chicken breasts or thighs.  Just reduce the cooking time because without the added fat from the bones and skin, the meat will dry out if cooked for too long.  I have to say, I'm not usually a fan of bones, but they did contribute to a really rich and delicious flavor that I am not sure you could achieve without.  But, try it the other way, if you must!  Hopefully you will find this chicken (previously known as Sputnik) out of this world!  (Ha, ha...thanks, Angie!)

Chicken Paprika
Serves 3

1 TBSP olive oil
1 TBSP butter or spread
1/4 cup flour
3 bone-in, skin-on chicken breast halves
1 large onion, halved and sliced in 1/2 inch slices
2 large potatoes, peeled and sliced in 1/2 inch slices
4 cloves garlic, minced
2 TBSP Hungarian sweet paprika
3/4 cup grated Pecorino Romano cheese (like Locatelli)
1 tsp salt (add more if needed)
fresh ground pepper
3/4 cup cooking sherry
1 cup chicken broth

In a large dutch oven or cast iron pot, heat butter and oil until hot.  Coat each side of the chicken with the salt, pepper and flour. Add chicken to pot and cook on one side until browned. Flip chicken.  Add onion, garlic and potato to the top of chicken.  Sprinkle on paprika, cheese, salt and pepper.  Add sherry and broth around the sides and cover.  Simmer for 1-1.5 hours until chicken is done and potatoes are very soft (but not mushy!).  Add more paprika and cheese, if desired.  Serve and enjoy!

Download PDF of Recipe

Wednesday, October 12, 2011

What's for Lunch? Split Pea with Smoked Turkey Soup!

It has been rainy and gross for the past three days and nothing calls for soup more than rainy days.  My grandmother made the best split pea soup.  Back in the day, I didn't eat meat, so she would make a special batch just for me without the ham in it.  Now-a-days, I ask myself, "what was I thinking not eating ham??"...but that's another story.  In this batch, I replaced the ham with smoked turkey, but it tastes very similar.  If you can't find a smoked turkey leg, feel free to add a ham steak, ham hock, etc. etc. to add the smoky flavor and meat.  And in our family, we have a little joke.  My grandmother would tell us every single time she made this soup, "you know, if it gets too thick, you can just add a little water to thin it out".  Wise words of advice to heed when reheating.  I hope you enjoy this as much as I do!  Serve it with a grilled cheese...and rain, rain, go away!!

Split Pea with Smoked Turkey Soup
Serves 6

1 TBSP olive oil
1 large onion, diced
2 carrots, peeled and diced
2 stalks celery, diced
4 cloves garlic, minced
1 16-oz bag split peas
6 cups chicken stock
6-8 sprigs fresh thyme, leaves stripped (or throw the whole bundle in and fish out the stems at the end)
1 smoked turkey leg (remove outer skin)
salt and pepper to taste

In a large pot, heat olive oil.  Add onion, carrot and celery and saute until they start to get soft, about 8 minutes.  Add garlic and saute one minute more.  Add peas and stir.  Cook for a couple of minutes.  Add 4 cups water, bring to a boil.  Add in thyme and turkey leg.  Reduce to simmer and cover. Stir occasionally and add more broth as needed.  After about 45 minutes, the soup should be starting to get very thick.  Keep adding broth and simmering until peas are tender. 30 minutes before serving, remove turkey leg to cutting board.  Let cool and then cut meat from bone and dice into small pieces.  Add back to soup.  When ready, serve!

Download PDF of Recipe

Thursday, October 6, 2011

What's for Dinner? Chicken with Creamy Mushroom Sauce over Polenta!

Today I had polenta on the brain.  I have no idea why, but it was one of the first things that popped in to my head this morning when I was thinking about what to make for dinner.  I haven't had it in a while, but love it.  I mean, it tastes a lot like grits and what good Southerner doesn't like grits?  This meal, even though it sounds fancy, is pretty easy to make.  If you really wanted to cut corners, you could cut out the pan-frying of the polenta and just bake it while you cook the rest.  This meal is dedicated to my sister who looooooves mushrooms.  Just kidding, she hates them with a fervent passion.  Good thing she doesn't live close enough to come to dinner on a regular basis because I adore them.  I hope you do, too!  Enjoy!

Chicken with Creamy Mushroom Sauce over Polenta
Serves 4

1 tube, pre-prepared polenta (you could make your own, but I kept it easy tonight!)
3 TBSP butter, divided
3 TBSP olive oil, divided
1 lb chicken cutlets (or you can pound out regular breasts very thin)
1/2 cup flour
3 fresh rosemary sprigs, leaves stripped and minced
salt and pepper to taste
1 shallot, minced
2 cloves garlic, minced
2 packages fresh assorted gourmet mushrooms (mix of cremini, shitake, oyster, etc.)
1 cup chicken broth
1/3 cup mascarpone cheese (find this in the gourmet cheese section)
2 TBSP fresh minced parsley

Preheat oven to 300.  Slice polenta into 1/2 inch rounds.  In a large skillet, heat 1 TBSP butter and 1 TBSP oil.  When hot, add polenta slices.  Saute 5 minutes on one side, or until golden and flip.  Saute second side until golden.  Transfer to a baking sheet and place in oven.

While polenta bakes, combine flour, half the rosemary and salt and pepper.  Dredge chicken in flour until well-covered on each side.  Use same skillet as polenta (scrape out any polenta bits).  Heat another TBSP of butter and 1 TBSP of oil.  Fry chicken on one side until golden.  Flip and saute the other side until chicken in cooked through.  Reserve on a plate.  Add remaining butter and oil to pan.  Add another 2 TBSP of the seasoned flour to pan and stir.  Add shallot and saute 1-2 minutes until they begin to soften.  Add mushrooms and saute until they are soft.  Add garlic and remaining rosemary and saute for one minute more.  Add broth and stir.  Let cook until sauce starts to thicken.  If too thick, add more broth.  Add salt and pepper to taste. Stir in mascarpone and remove from heat.  Add parsley.

Remove polenta from oven.  Add 3-4 pieces of polenta, a quarter of the chicken and a quarter of the mushroom sauce to each plate.  Enjoy.

Download PDF of Recipe

Monday, October 3, 2011

What's for Dinner? Salade Nicoise!

We had a wonderful weekend celebrating two of our best friends', Tim and Meredith's, wedding.  It was a weekend of partying (for those of us who aren't pregnant) and eating (times two for me!).  Usually after weekends like this, we have salad Mondays, to make us feel a little better about ourselves.  One of my favorite salads to do is a Salade Nicoise, a classic salad you find all over France.  It is really easy, filling and tasty. Good thing, too...I got a last minute call from my friend Missy asking me to watch her baby for a few hours.  It was actually great practice for having a household with two young kids, and I was proud of us.  Between Sully and I, we got Finn fed, got the salad made, ate, and occupied baby Mari all at the same time.  Piece of cake!  :)  I put the (mostly) classic Nicoise ingredients in here, but feel free to mix it up with things you like, although this combination is really fantastic.  The dressing is a little tangy on it's own, but combined with the other flavors of the salad, it goes perfectly.  Enjoy!


Salade Nicoise
Serves 2

2 small to medium red potatoes, steamed until soft
1 small bag French green beans, steamed or microwaved until soft
1/2 bag romaine or butter lettuce
1 Roma tomato, sliced
10 pitted Kalamata olives, sliced in half
2 hardboiled eggs, sliced
8 anchovy fillets
8 marinated mushrooms, quartered
2 TBSP capers
1 can or jar of good albacore tuna, packed in olive oil
Nicoise Dressing (recipe to follow)

In two large salad bowls, split all ingredients in half and layer in bowls.  Top with dressing.

Nicoise Dressing
Serves 4 (about 1.5 TBSP each)

juice of 1/2 lemon
1 TBSP red wine or white wine vinegar
2 TBSP dijon mustard
1 clove garlic
1 shallot, cut in large pieces
2 TBSP olive oil
1/2 tsp dried thyme
1 tsp minced fresh tarragon (can omit if you don't have this)
kosher salt and pepper to taste

Combine all ingredients in a mini prep food processor or blender and process until smooth. Add more olive oil to mellow it out a bit. Serve over salad.

Download PDF of Recipe

Thursday, September 29, 2011

What's for Dinner? Shredded Beef and Guacamole Tacos!

This week I've been a little busy.  My good friends, Tim and Meredith, are getting married this weekend and I am in the wedding.  So between errands/work for that and doctors appointments to find out that I am having ANOTHER BOY (AHHHHHH!), we've been having really quick and easy meals (none of them too blog-worthy).  But this one was another idea of my friend Angie.  It's so simple because you cook the meat in a crockpot with more of that delicious Frontera Skillet Sauce and you almost have an insti-meal.  Just take a few minutes to chop up some ingredients for the guac, and it really is a simple, good dinner.  If you don't dig on beef, you could probably do this with 3 or so chicken breasts...although I haven't tried it, so don't quote me on it!  :)  Enjoy!

Shredded Beef Tacos
Serves as many as you want it to serve!

1 chuck roast (I used a 2 lb roast and it made enough for probably 10-12 tacos)
1 packet Frontera Taco Skillet Sauce (I used the Chipotle Garlic flavor)
1/2 onion, diced
2 cloves garlic, minced
diced tomato
shredded lettuce
shredded cheese
salsa (try my recipe for "Spencer's Salsa" from last month)
Holy Guacamole (recipe to follow)
Sour cream
Flour or corn tortillas

In a crock pot, place chuck roast in and pour Skillet Sauce over top.  Sprinke in onions and garlic.  Cook for 6-8 hours until beef shreds easily with fork.  Shred meat.  Assemble tacos to your liking! 


Holy Guacamole!
Serves 4

2 large ripe avocados, halved and flesh scooped out into medium bowl
1 roma tomato, finely diced
1/4 small red onion, finely diced (eyeball this...don't go too crazy with the onion)
1 large handful of cilantro, chopped
1 clove garlic, pressed through garlic press
1/2 jalapeno, seeded and finely diced
juice from 1/2 lime
1/2 teaspoon ground cumin
1/2 teaspoon black pepper
1/2 teaspoon salt (fit this to taste)

Mash avocado in bowl to desired consistency (I like mine chunky).  Stir in all other ingredients.  Taste to make sure properly seasoned.  Serve with tortilla chips or on tacos!

Download PDF of Recipe

Tuesday, September 20, 2011

What's for Dinner? Easy Chicken and Broccoli Casserole!

Tonight is part two, continued from last night's dinner.  As you recall, from yesterday, I used half of a rotisserie chicken for my Biscuit Pot Pie.  Tonight, I used the other half in a casserole that is really quick and easy.  Good thing, because I had an old college friend, her husband and her baby drop by for a reunion and playdate.  When she left Sully and I were starving and didn't feel like cooking anything fancy.  Perfect! My friend Angie and I always talk about what we are making for dinner when we are at work, and she kind of came up with something similar to this when she had some leftover chicken to use.  It is quick, easy and yummy.  If you are looking for a no-fuss dinner, this is a keeper!  Enjoy!

Easy Chicken and Broccoli Casserole
Serves 4-5
  • 1 box Rice-A-Roni, chicken flavor, cooked to directions on box
  • 1 large bunch broccoli, cut into florets and steamed until just soft (or cooked in microwave)
  • 1/2 rotisserie chicken, picked from skin and bone and chopped
  • 1 can, cream of chicken soup (I use the low fat)
  • 1/2 cup sour cream
  • salt and pepper to taste
  • 1 cup shredded cheddar cheese
  • 1/2 cup seasoned breadcrumbs

Preheat oven to 350.  In a large mixing bowl, fold together cooked rice, chicken, soup and sour cream. Add salt and pepper to taste.  Spoon into 9x9 baking dish, coated with cooking spray.  Top with cheese and then breadcrumbs.  Spray top with more cooking spray.  Bake for 20-25 minutes until hot and bubbly.  Broil for 2-3 minutes to get top browned and crusty. Enjoy.

Download PDF of Recipe

Monday, September 19, 2011

What's for Dinner? Biscuit Pot Pie!

So, now that it is getting colder out (okay, okay, it was 82 today, but this morning it was 65 and felt awesome!) I am starting to crave more comfort-y foods.  I haven't made this yet this year, so I thought it was a good time to pull it out.  This is one of our favorites.  It is a pot pie, except instead of a thick pie crust topping, it has biscuits.  It is healthier for you and simple to make.  You can make it even easier if you substitute half a rotisserie chicken for the raw chicken breasts (I did this tonight, and tomorrow will have another recipe using the rest of the chicken) and frozen veggies (I use fresh, but nothing wrong with cutting corners!).  Give it a try, it is perfect for fall, even if it is still warm out!  Enjoy!

Biscuit Pot Pie
Serves 5-6
  • 2 T olive oil
  • 3/4 lb boneless chicken breasts (OR 1/2 rotisserie chicken, white and dark meat, meat pulled from bones and skin and chopped)
  • 2 T butter or spread
    1 medium onion, diced
    3 stalks celery, diced or thinly sliced
  • 8 medium white mushrooms, quartered
    3 carrots, peeled and diced
  • 1/3 cup frozen peas (if you want to make it a bit easier, omit fresh carrot and use a frozen veggie medley here)
    1/4 cup all-purpose flour
  • 2 cups chicken broth
  • 1/4 cup half & half (or heavy cream or milk)
  • kosher salt
  • freshly ground black pepper
  • 1 1/2 teaspoons poultry seasoning
  • 6 sprigs fresh thyme
  • 4-5 dashes of Tabasco (optional)
  • cayenne pepper to taste (optional)
  • 1 can refrigerated buttermilk biscuits (don't use the huge "Grands" ones...just regular size)

Preheat oven to 350. Heat 1 TBSP oil in skillet with an oven-proof handle.  Add chicken (may slice chicken before hand to reduce cooking time).  Sauté until chicken is cooked through.  Transfer to cutting board, let cool and chop (if using rotisserie chicken, omit this first part.) In same skillet, heat butter/oil over medium-high heat.  Add onion, celery, carrot and mushrooms and sauté until soft.  Add garlic and saute one minute more.  Sprinkle flour over veggies and cook for about a minute.  Slowly pour in chicken broth, stirring constantly.  Simmer until mixture is very thick, about 3-6 minutes.  Add in half & half. Add more chicken broth if necessary.  Add chicken and frozen peas into vegetable mixture and bring to a low boil.  Remove from heat (mixture should be thick).  Add salt, pepper, poultry seasoning, thyme, Tabasco and cayenne.  Place uncooked biscuits on top of mixture, evenly spaced, about ½-1 inch apart until top is fully covered.  Put skillet in oven (if no oven-proof skillet, pour mixture in a glass baking dish before topping with biscuits) and bake according to biscuit instructions until biscuits are cooked and brown on top and mixture is hot and bubbling (I found that it takes longer than the biscuit instructions...up to 10 minutes longer...just watch them!).

Wednesday, September 14, 2011

What's for Dinner? Chicken Noodle Soup!

We're back from Grand Cayman, and it was an amazing trip.  Just what we needed...sun, sand, and baby-free laziness for 4 days (thanks mom and dad for making it possible)!  We had a fabulous time, but were happy to come back and see our little cutie.  Somewhere in between Grand Cayman and Wilmington, I contracted a pretty nasty cold (and really attracted friends on the plane by sneezing and sniffling the whole way home).  I then I had to drive up to Raleigh to pick up Finn from my parent's house.  While I was there, my wonderful mother was so sweet to cook me up a batch of chicken soup, sure to help me feel better.  I brought it back to Wilmington with me and we had it for dinner tonight and I do believe I am already on the road to recovery.  This soup recipe is a cross between hers and mine, and it is a keeper...make it any time you feel under the weather, or if it's just cold outside and you want something warm and comforting.  Served with a grilled cheese--you have the perfect meal.  Enjoy!  And glad to be back (sort of)!

Chicken Noodle Soup
Serves 4-5
  • 2 large chicken breasts, or 1/2 rotisserie chicken, meat pulled from the bones and shredded
  • 4-6 cups chicken stock or broth (can use low sodium to better control the salt)
  • 1 TBSP olive oil
  • 1 medium onion, diced
  • 3 celery ribs, diced
  • 2 carrots, peeled and sliced (or the equivalent amount baby carrots)
  • 1 carton sliced white mushrooms
  • 4 cloves garlic, minced
  • 2 tsp poultry seasoning
  • 6-8 sprigs fresh thyme (do use fresh here...it really makes the flavor)
  • 1 15-oz can cannellini beans, drained
  • 2 cups egg noodles
  • 2 cups baby spinach
  • salt and pepper to taste

If using raw chicken breasts, in a medium saucepan, add 2 cups chicken broth and boil chicken until done.  Shred chicken into large pieces with two forks and leave in broth.  Set aside.

Eat your soup!
In large soup pot, add olive oil and saute onion, celery, carrot and mushrooms until soft.  Add garlic and saute 1 minute more.  Add reserved shredded chicken and 4 cups broth.  Bring to simmer. Add poultry seasoning, thyme and beans.  Continue to simmer for 20 minutes to 2 hours (however much time you have!).  Add more broth or water if it becomes to thick. Five to ten minutes before serving, add egg noodles and spinach and turn heat up just a bit (again, watch liquid content...if it needs more liquid, add more!).  When noodles are tender, taste and season with salt and pepper.  Enjoy, and feel better if you are sick! :)

Download PDF of Recipe

Wednesday, September 7, 2011

Back Next Week!

Sully and I are taking a much needed vacation to Grand Cayman, sans baby, and will return next week (hopefully with some new recipe ideas in tow)! We'll see you then.  Cheer!

Laurie and Sully

Thursday, September 1, 2011

What's for Dinner? Fall(ish) Chili!

It's the first day of September, and when I stepped outside this morning, there was a slight (dare I say) chill in the air!  It felt great and got me really excited for Fall.  So in honor of that, and it being the first night of college football (and Sully's Fantasy Football draft), I decided to make chili tonight (no mind that it ended up at 85 degrees out!).  I think chili is one of those things that is hard to mess up.  You really just throw a bunch of ingredients--whatever you like--in a pot, cook for a couple of hours, and it usually turns out pretty good.  This little concoction I came up with turned out great.  I used lean beef and hot italian sausage for a little kick, but you can use anything from beef to turkey to bison. Just cook for at least 2 hours, and preferably longer, to give it time for the flavors to meld.  You can even do it in the crock pot and set it to cook on low all day.  Be creative! I can't wait for Fall weather (and food), every day!!  Enjoy!

Fall(ish) Chili
Serves 6

  • 2 tbsp olive oil
  • 1 large yellow onion, finely chopped
  • 2 stalks celery, finely chopped
  • 1 green bell pepper, seeded and finely chopped
  • 1/2 red bell pepper, seeded and finely chopped
  • 1 jalapeno pepper, seeded and chopped
  • 3 cloves garlic, minced
  • 1 pound ground beef (can use turkey or bison as well, at any fat level)
  • 3/4 pound hot Italian sausage (can use turkey or chicken sausage instead of pork)
  • 1 (15 ounce) can chili beans (or you can also use black beans)
  • 1 (15 ounce) can dark red kidney beans, drained
  • 1 (28 ounce) cans diced or crushed tomatoes with juice
  • 2 tbsp tomato paste
  • ½ cup pureed pumpkin (NOT the pumpkin pie filling)* [this is my mom's secret chili ingredient--adds extra fiber and vitamins, but you can't taste it...promise!]
  • 1/2 cup beer
  • 2 tbsp powdered beef bouillon (or 2 cubes)
  • 2 tbsp chili powder
  • 2 tsp dried oregano
  • 1 tsp cumin
  • 1/2 tsp dried basil
  • 1/2 tsp cayenne pepper
  • 1/2 tsp paprika
  • salt & ground black pepper to taste
  • shredded cheese (for garnish)
  • diced onion or green onion (for garnish)
  • sour cream (for garnish) 

In a large stew pot, heat olive oil over medium heat and add onion, celery and peppers.  Saute for 5-7 minutes, until veggies begin to soften.  Add garlic and saute one minute more.  Pour into bowl and set aside.  In same pot add meat and brown over high heat.  Make sure to break up the meat in very small pieces.  When meat is browned, add back in veggies.  Add tomatoes in juice, tomato paste and pumpkin and stir to combine.  Add in beans and beer.  Add all spices.  Reduce heat to simmer and cook for at least 2 hours (the more, the better!).  Garnish with goodies on top (and tastes really good over spaghetti and/or with crushed Fritos on top...ohhhhh, yeah!).

Wednesday, August 31, 2011

What's for Dinner? Taco Bowls!

*So, Sully gets all the credit for this one, because it was his brilliant idea.*  We had some chicken marinating that we needed to use, and I wanted something healthy (it might be due to the fact I had a big Philly Cheese Steak with fries and Ranch for lunch...hmmmm: you think I am pregnant or something?).  Sully thought we should try to bake a tortilla in the shape of a bowl (kind of like how they do it in Mexican restaurants...only theirs is deep-fried and WAAAAY bad for you!). We weren't sure if would get crispy enough in the oven, but it did, and it came out really good (it would also be good with homemade tortillas from your local Hispanic Market--they usually sell them for cheap). You still get the crispy carbs in your salad, but without the artery-clogging after effects.  You can layer in your favorite ingredients and you have an easy, healthy and tasty meal. Give it a try!

Grilled Chicken Taco Bowl
Serves 4
  • 4 large flour tortillas
  • olive oil
  • salt
  • 2 chicken breasts (if you think about it in advance, marinate the chicken overnight in your favorite marinade)
  • refried beans, warmed in the microwave
  • shredded cheese (if you are feeling authentic, use crumbled Cojita, or any kind will do)
  • diced tomatoes
  • jalepenos
  • salsa
  • guacamole
  • sour cream
  • cilantro

Preheat oven to 475. Brush tortillas on both sides with a small amount of olive oil. Sprinkle one side with salt.  Place each tortilla in an oven-safe bowl (form to bowl shape).  Place 4 bowls on a cookie sheet.  Bake in the oven for 10 minutes.  After 10 minutes, check the tortillas. If they seem to be crisping at this point, carefully take the tortillas out of the bowls and flip upside down and place back on cookie sheet.  Back another 3-4 minutes until golden (just keep an eye on them...every oven cooks a little differently).  If not browned, broil each side a couple of seconds until they are lightly browned.

Meanwhile, grill chicken breasts.  Let cool slightly and chop up to desired size.

Layer desired ingredients in tortillas bowls.  Enjoy!

Download PDF of Recipe

Tuesday, August 30, 2011

What's for Dinner? Linguine with White Clam Sauce!

I don't know what it is that I love about linguine with white clam sauce.  I always order it at Italian restaurants.  I just like the garlicky-winey-clammy flavor (haha, that sounds kinda gross).  I have made this dish with fresh clams and it is great, but quite honestly, after you get done cleaning, shucking and chopping them...it doesn't taste THAT much different than using canned clams (some of you may want to strangle me for this, but I'm just being honest).  If you want to use fresh clams, by all means, do it!  But the rest of us that have to have dinner done quick will use canned!  Serve with a quick side salad. I hope you enjoy this easy meal!

Linguine with White Clam Sauce
Serves 4

9 oz fresh linguine or 1/2 box dried
2 TBSP olive oil
2 TBSP butter, divided
1 large onion, finely diced
3 cloves garlic, minced
2 small cans minced baby clams (juice reserved)
1 can whole baby clams (drained)
1/2 cup white wine
1 heaping tsp dried oregano
1/4 cup fresh parsley, minced
crushed red pepper, to taste
fresh cracked black pepper, to taste
salt, to taste
grated cheese

In a pot, bring water to a boil.  Add linguine and boil for the appropriate amount of time.  Drain, add 1 TBSP of butter, toss and set aside.

In a large skillet, heat oil and 1 TBSP butter.  Add onion and saute until translucent (about 3-4 minutes). Add garlic and saute 1 minute more.  Add clam juice and wine and simmer for another 2-3 minutes.  Add clams and herbs.  Cook until warmed through.  Add pasta and toss to coat.  Serve and top with grated cheese.  Enjoy!

Download PDF of Recipe

Monday, August 29, 2011

What's for Sides? Spanish Rice!

**First of all, I must start by correcting an error in my last post.  Teriyaki is Japanese, not Chinese, as one of my dear Foodie Gurus pointed out.  She is, of course, correct, so if you are using it in a Japanese-style dish it is Teriyaki Sauce.  If you are using it for a Chinese-style dish, we'll call it Stir-fry Sauce!  There...that settles that!  :)

Tonight I was in a rice mood.  Not sure why but as I was thinking about what kind of rice, a dish came back to me that sounded good.  My roomate in college's mom used to make a version of Spanish rice and she would bring a huge batch of it down with her any time she would visit.  We would devour it like vultures (pretty much went for anything that didn't come from the cafeteria).  What was interesting about it is that it has green olives in it.  I didn't think I would like it, but it gives it a unique flavor. 

Now this rice, to me, tastes very Creole-esque.  But I guess Creole cooking is partially influenced by the Spanish. The saffron gives it more of a Spanish flair, along with the spanish olives.  If you don't have saffron, you can omit it.  If you do, maybe use the Mahatma Yellow Saffron rice in the store (just adjust the liquid to what it calls for on the packet).  If you hate olives (a lot of people I know, do), then you can omit those as well, but I do think they give this dish a little something extra.

I served this along marinated chicken and veggie shish-kabobs, but you could do just regular grilled chicken.  The rice tastes great with the chicken kind of mixed in.  I hope you enjoy!

Spanish Rice
Serves 4


2 TBSP olive oil
1/2 onion, finely diced
1/2 green bell pepper, finely diced
1/2 red bell pepper, finely diced
2 stalks celery, finely diced
3 cloves garlic, minced
1 tsp chili powder
1 1/2 cups arborio rice (or white rice...adjust fluid accordingly)
3 cups chicken broth
1 large pinch saffron
1 can diced tomato, with juice
1/3 cup sliced Spanish olives
salt and pepper to taste

In large pot, heat olive oil.  Add onion, peppers and celery and saute until they begin to soften, about 3-4 minutes.  Add garlic and heat for one minute more.  Add chili powder and stir to combine.  Add rice and cook for one minute more.  Add in 2.5 cups broth and stir.  Add in saffron. Simmer, covered, on low for about 10 minutes, stirring every several minutes. Add in tomatoes and juice and return cover.  Cook another 10 minutes or until rice is fluffy and has absorbed the liquid.  If more liquid is needed, add it.  Add in olives and stir.  Season with salt and pepper.  Serve and enjoy!

Download PDF of Recipe

Friday, August 26, 2011

What's for Dinner? Hurricane Teriyaki!

The start of the hurricane, at high tide
As I write this, we are listening to the pouring rain and whistling wind of big, bad, Hurricane Irene.  Well, she's as least big. The jury is still out on whether she is bad...I guess we'll know in the morning. 

So since we were trapped in the house tonight, we thought we should make dinner with some things from the freezer, just in case we lose power and have to pitch some of it.  Our friends Brian and Laura are here riding out the storm with us (after the owner of the beach house they were to rent for the weekend called to tell them he was giving them their money back and going down to board up the house).  We had some filet tips in the freezer and (RANDOM) egg rolls and potstickers.   So, Sully thought of steak teriyaki and creating a Chinese feast.  We were kind of thinking the power was going to go out at any minute, so we got down to business.  We have always had trouble making a good brown sauce for Chinese food.  It just never comes out as flavorful or as good as when you get it from a good Chinese place (probably the lack of MSG-ha!).  But we found this recipe and adapted it a little bit and it came out so good! 

We didn't have too much (that is perishable) in the house, but we had some green beans, so that had to do (it's fun to make something good out of nothing...Sully's a pro).  This sauce would be great with chicken and/or beef with broccoli and/or any kind of veggie mix.  Jasmine rice was also really good with it because it was fluffy and sticky and it was a great base for the sauce.  I hope you try it...without the hurricane.  Enjoy!

Hurricane Teriyaki Sauce
Serves 4

2/3 cup low sodium soy sauce
1 cup chicken broth
1/3 cup rice wine vinegar
3 tablespoons sugar
1 tbsp toasted sesame oil
1/4 tsp pepper
2 tbsp corn starch
1/4 cup water
2 tbsp canola or peanut oil
1 tbsp minced garlic
1 tbsp minced ginger (keep your peeled ginger in the freezer and grate frozen piece...makes it easy!)

Combine soy, broth, vingegar, sugar, sesame oil and pepper in a small bowl.

Dissolve cornstarch in water.

Heat saucepan over high heat and add canola oil. Add garlic and ginger and cook until fragrant, about 1 minute.  Add soy sauce mixture and bring to a boil. Reduce heat to medium low and cook for 1 minute.  Add cornstarch mixture and cook until the sauce thickens.  If sauce gets too thick, add more broth or water.

Monday, August 22, 2011

What's for Dinner? Chicken Marsala!

Sorry I fell off the wagon last week.  Not sure why, but we just didn't cook a lot...we had a lot going on!  But I'm back, baby.  Tonight, I had two containers of mushrooms in the fridge I wanted to use (I tend to buy multiples of things because I forget that I have already bought them...anyone sympathize?). Chicken Marsala is a really easy and yummy dish that was perfect.  It really only takes about 15 minutes to make.  Works for me!  You can use a variety of mushrooms, to fancy it up, or just use your standard whites.  I served it with green beans sauteed with shallots and we had a great, easy meal.  Give it a try. Enjoy!

Chicken Marsala
Serves 4
  • 1/2 cup flour
  • 1/2 tsp dried (or fresh) thyme
  • 1/2 tsp dried oregano
  • 1/4 tsp cayenne pepper
  • 1 tsp salt
  • 1 tsp pepper
  • 1-1.25 lb chicken cutlets (I buy the already pounded cutlets, but you can buy regular breasts and pound them out thin between two sheets of plastic wrap)
  • 2 TBSP olive oil
  • 2 TBSP butter (I use Brummel & Brown spread)
  • 2, 8 oz pkg sliced mushrooms (use any varieties you like)
  • 2 garlic cloves, minced
  • 1 cup chicken broth
  • 3/4 cup Marsala wine
  • salt and pepper to taste
  • 1/2 lb angel hair pasta (or any cut you like)

In a shallow bowl, add flour and spices and mix together.  Dredge chicken cutlets in flour mixture until well coated.  Set aside.  In a large frying pan, heat 1 TBSP oil and 1 TBSP butter until hot.  Add half chicken cutlets and saute on one side, about 3-4 minutes until golden.  Flip chicken and saute about 2 minutes more.  Reserve to plate.  Add the remaining oil and butter and chicken and repeat steps. 

In a pot, bring water to boil and add pasta.  Cook according to directions. Drain and set aside.

After chicken is done and removed from the pan, add in mushrooms.  Saute until they start to get tender.  Add garlic and saute one minute more.  From the remaining flour in bowl, sprinkle 2-3 tablespoons over mushrooms and stir to coat.  Cook 1 minute more. Add chicken broth and Marsala wine and let simmer until it begins to thicken.  Add chicken back to pan and simmer, about 5 minutes more until sauce is thick (if it gets too thick, add more broth).  Season with salt and pepper. Serve over pasta and enjoy!

Download PDF of Recipe

Wednesday, August 17, 2011

What's for Lunch? Salmon Salad!

If you are anything like me, when you cook fish and you have any leftover, it usually goes in the trash a few days later. Nothing is worse than reheated fish.  Not only does it smell up the house, but it dries out and tastes nasty.  Well, here is a solution.  Make fish salad out of it.  Sounds weird, I know, but it is good! There is a place down in Southport, NC that makes these amazing Grouper Salad Sandwiches.  And a restaurant that I like in Cary makes really good Salmon Salad.  I took this cue from them with leftover grilled salmon that I had from the other night.  It is easy to make, makes a good lunch the next day and makes you feel good that you used that leftover fish instead of pitching it. 

Make this recipe with really any fish you have left over.  Just make sure your fish is cooked through (if you like your grilled fish underdone, keep what you think you won't eat on the grill for a few more minutes).  Depending on the fish you have, use the same dressing base, just adjust the other ingredients to those that go well with that fish--be creative (celery, pickle relish, roasted red peppers, etc.).  Serve with pita points or crackers and enjoy!

Salmon Salad
Serves 4
  • 2 TBSP creole (or whole grain) mustard
  • 1/3 cup mayonnaise (I use light Olive Oil mayo)
  • 2 TBSP white wine vinegar
  • 3/4-1 lb leftover salmon, flaked (make sure any bones are removed!)
  • 1/4 cup finely diced red onion
  • 1/4 cup frozen peas, defrosted (or fresh, if you have them)
  • 2 hard boiled eggs, chopped
  • salt and pepper to taste

In a small bowl, combine mustard, mayo and vinegar.

In a large bowl, add fish.  onion, peas and eggs.  Carefully combine.  Fold in dressing mixture until well-coated.  Season with salt and pepper.  Enjoy.

Download PDF of Recipe